| |
Overview |
This guide provides a step-by-step explanation of the full assignment lifecycle in 20/20 Solutions. It covers key functionalities including assignment stages, grouping and table structure, inspection request creation, and status tracking. Users will learn how to define inspection types, manage assignment groups, modify details such as inspection addresses and durations, add relevant notes, and clone or cancel inspections and groups. As new features continue to be developed, this guide will be updated periodically to reflect the latest system enhancements and best practices. |
Core Functional Areas of the Assignment Module |
- Stages of Assignments
- Table and Group By
- Creation of an inspection request
- Inspection Types
- Assignment ‘Groups’
- Modifying of an Inspection Address
- Inspection Duration
- Assignment Notes & Accounting Notes
- Cloning of an inspection
- Assignment Status & Confirmation Status
- Editing of an inspection Group
- Cloning of an Inspection Group
- Cancellation of an Inspection and Group
|
Stages of Assignments |
Our Assignment System operates across three distinct stages, each determining what level of creation and modification access you have for assignment requests:
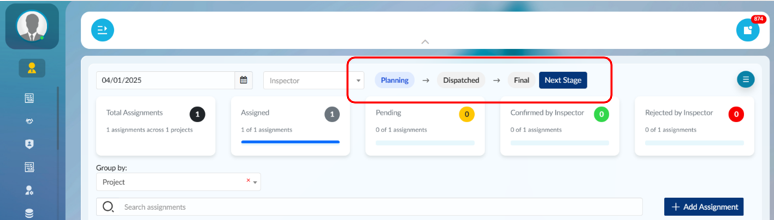 20/20 Solutions: Stages of Assignment 1. Planning Stage- Full flexibility: You can create, modify, and delete assignments without restrictions.
- Purpose: This is the preparation phase where you organize and plan all assignments for the day.
2. Dispatched Stage- Assignment Confirmations Sent: Once assignments are dispatched, all assigned inspectors will receive confirmation emails.
- Limited modifications:
- You can still add new assignments or modify existing ones.
- If you modify a confirmed assignment, the inspector will be required to reconfirm.
- If you add a new inspection to an assignment group, the assigned inspector will immediately receive a confirmation email.
3. Final Stage- Day of Inspection: This stage begins the morning of the scheduled inspection.
- Locked assignments:
- Confirmed assignments are now locked and available on the inspector’s tablet.
- You cannot freely edit or delete confirmed assignments.
- Allowed actions:
- You can cancel an assignment.
- You can add new inspections to a group (the inspector must confirm any new additions).
- Restrictions:
- You cannot reduce an inspector’s scheduled assignment time once in the Final Stage.
|
Table & Group by Functionality |
The Assignment System page is designed to resemble the Google Sheets assignment system to make the transition smoother and more familiar. The table layout is organized into three main groupings: 1. Dark Grey Rows – Group By Field- Displays the field you are grouping by.
- You can currently group by Project or Project Manager.
- Grouping by Project Manager mirrors the typical organization used in the Google Sheets system.
2. Light Grey Rows – Assignment Group- Represents an Assignment Group, which is a set of assignment requests tied to the same assignment/project for an inspector during a single shift.
- If multiple inspectors are assigned to the same project, each inspector will have their own separate assignment group.
Example:
Assigning two different inspectors to the same project will result in two distinct Project Groups under that project or grouping by Project Manager displays the assignment groups and their associated inspections for each manager.
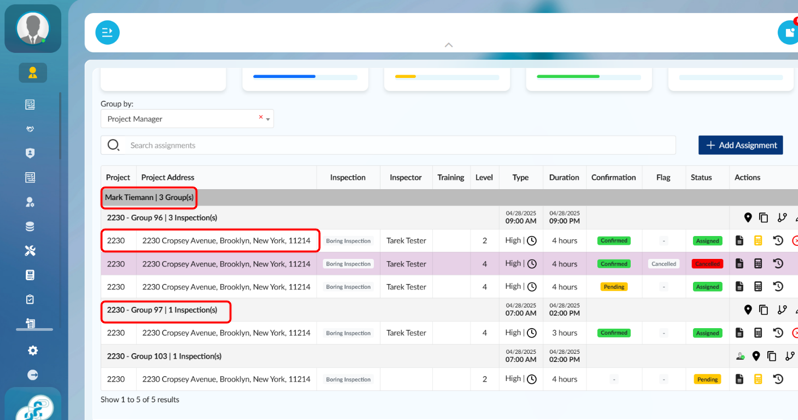
20/20 Solutions: Grouping by Project Manager (Mark Tieman), displaying Assignment Groups (e.g., Group 97) with their associated individual inspections 3. White Rows – Individual Inspections- These are the specific inspection requests under each Project Group.
- Each white row shows the following details:
- Project Code
- Project Address
- Inspection Name
- Inspector Name
- Inspection Level
- Type and Duration
- Confirmation Status
- Assignment Status
4. Light Pink Rows - Cancelled inspections- When an inspection is cancelled, it is still displayed but appears with a light pink row background to differentiate it visually.
- The "Cancelled" status is clearly shown using a red badge under the Confirmation and Status columns.
- This ensures transparency and tracking of cancellation events, even after removal from the schedule.

20/20 Solutions: Cancelled inspections appear with a light pink background and a red "Cancelled" label. Live Updates - The Assignment page is live and dynamic.
- Any changes made by another user will instantly reflect on your screen without needing to reload, just like the Google Sheets system.
- This ensures that everyone is working with up-to-date, synchronized assignment information.
Assignment Statistics At the top of the Assignment page, you will find daily statistics, including: - Total number of assignment requests
- Number of inspections that are assigned
- Number of inspections that are pending (yet to be assigned)
- Number of inspections confirmed by inspectors
Number of inspections rejected by inspectors 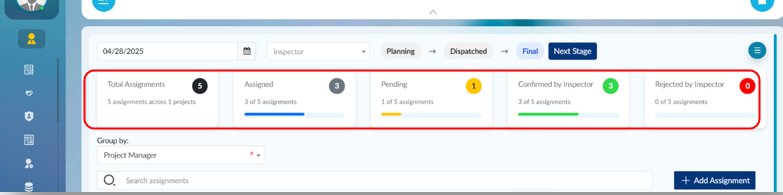
20/20 Solutions: Assignment summary widgets display real-time status counts, including total assignments, assigned, pending, confirmed, and rejected by inspectors for selected date.
|
Creation of an Assignment Group |
To create an Assignment Group: 1. Click “+ Add Assignment”- Located on the top-right corner of the data table.
- Opens the assignment creation form.
2. Select the Project- Choosing a project will automatically populate the project address.
- If the assignment location differs (e.g., Shop Inspection), you can click “Edit Address” to modify it manually.
3. Set Start Date and Start Time- By default:
- Start Date = Current assignment date
- Start Time = 7:00 AM
- Adjust these fields as needed to reflect accurate scheduling.
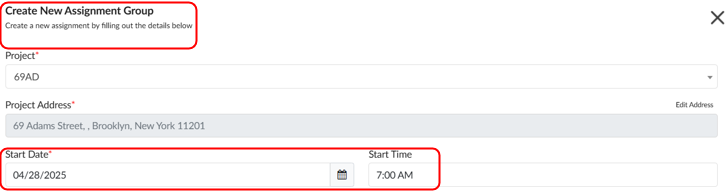
20/20 Solutions: When creating a new assignment group, select the project name. The project address is auto-generated, and the assignment date auto-populates with today’s date. Users must carefully review and adjust the date. 4. Review End Date, End Time, and Total Duration- These fields are automatically calculated based on the inspections you add to the assignment.
No manual entry is needed unless inspections are adjusted
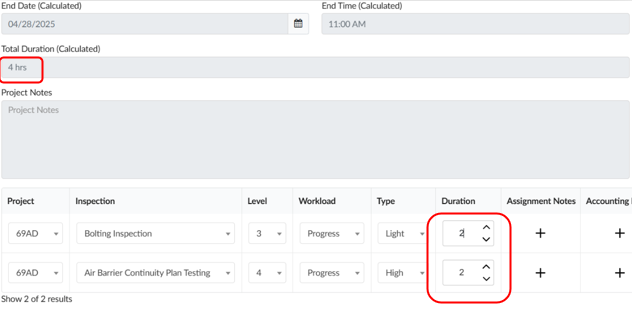 20/20 Solutions: Total Duration is automatically calculated based on the sum of inspection durations. 5. Enter Project Notes (Optional)- Project Notes are a new feature to communicate important instructions across all assignments for that project.
- Example: "Check in with GC upon arrival."
- You can update Project Notes at any time in the Projects Page.
6. Add Inspections- Click “Add Row” at the bottom left to create a new Inspection Row.
- Fill in the following for each inspection:
- Inspection Name
- Level
- Workload (Heavy/Light)
- Inspection Type (Periodic/Progress)
- Duration (auto suggested but adjustable via arrows)
- If related projects exist (e.g., NYCHA multiple project codes), you can assign different projects to each inspection while keeping it in the same assignment group.
7. Add Assignment Notes and Accounting Notes (Optional)- Assignment Notes: Specific instructions for the inspector.
- Accounting Notes: Specific notes for accounting staff to review.
8. Use Action Buttons: Clone and Delete- Clone: Duplicate inspection rows quickly (useful for similar inspections on different levels).
- Delete: Remove inspection rows if necessary.
Important Notes on Duration - The total duration is the sum of all inspection durations in the group.
- Example:
- Inspection A: 8 hours
- Inspection B: 3 hours
- Total Assignment Duration: 11 hours
- Warning Pop-up:
- If total duration is less than 3 hours or greater than 8 hours, a warning popup will ask you to confirm if the duration is correct.
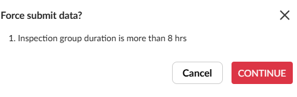
20/20 Solutions: A warning appears if total duration is under 3 or over 8 hours, prompting user confirmation. 9. FinalizeAfter completing your inspections and details, click “Add Assignment Group” on the bottom right to save and create the assignment. 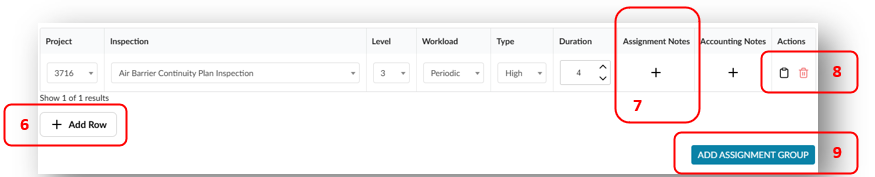
20/20 Solutions: Add inspections, enter details, and finalize the assignment by clicking “Add Assignment Group. |
Assignment and Confirmation Status |
1. Confirmation Status - Confirmed - The inspector has confirmed and accepted the assignment.
- Pending - The assignment email was sent to the inspector but it is still awaiting confirmation or rejection.
- Reconfirmation Pending - The inspector had previously confirmed the assignment, but a modification was made afterward. The inspector must reconfirm.
- Rejected - The inspector rejected the assignment request. The assignment must be reassigned to another inspector.
2. Assignment Status- Pending - The inspection has not yet been assigned to any inspector.
- Assigned - The inspection has been assigned to an inspector.
- Cancelled - The inspection has been cancelled.
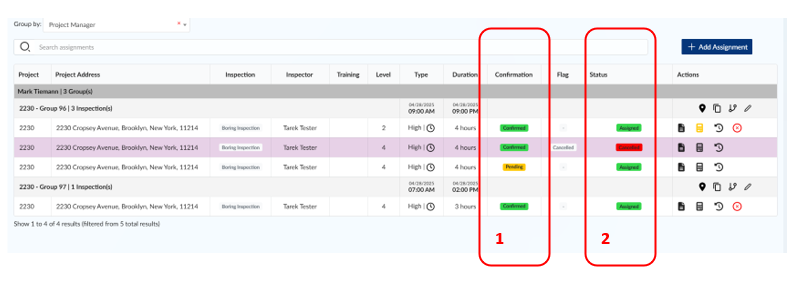
20/20 Solutions: Different statutes overview. |